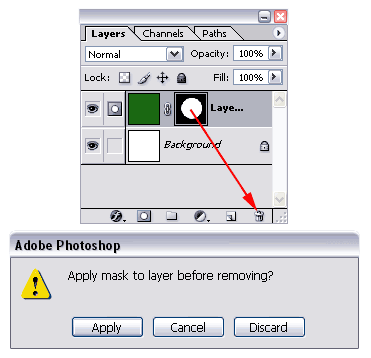
Delete a Layer Mask |
Apply: Apply the mask to the layer first, before removing it. Read more about this in the section "Apply Layer Mask'.
Cancel: Cancel this action
Discard: Remove the layer mask but keep the layer itself intact.
Edit a Layer Mask in the document window |
We can edit the mask in the document windows by holding down the Alt key while double clicking on the mask.

Right click on Layer Mask (context menu) |
Several options deal with a Selection. We'll talk about this later.
Earlier you've learned how to disable a mask, how to apply or discard it. You'll notice that all these 3 options are available in the context menu.
The Layer Mask Options gives you the opportunity to change the color of the opacity mask. You'll read more about that later.

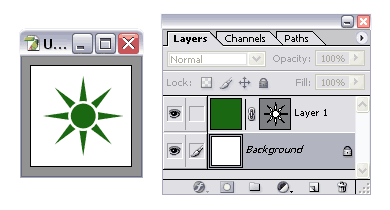
Apply Layer Mask |

This is the result of applying the layer mask to the layer:

We can apply a layer mask to a layer by:
- Clicking on apply when we want to delete a layer mask and getting the message "Apply mask to layer before removing?"
- Merging the layer with its mask with the layer underneath (Ctrl + E / Command + E on the Mac).
- Right clicking on the Layer Mask and selecting in the context menu 'Apply Layer Mask'.
- In the menu: Layer / Remove Layer Mask / Apply
Layer Mask with gray |

It's easy to understand that white makes part of a layer visible and that black makes things invisible. Look at everything in between as changing the opacity of the layer. The opacity is the transparency of a layer.
In this example
we have a gray mask and it has the same effect as changing the opacity, so the
green looks lighter and that's because part of the bottom
layer
(white) is shining through.
If the bottom layer would
have been black, then the result would have been a darker
green.
You can see what kind of effect gray scale masks have
by enabling/disabling them a few times (see 'Disabling
a Layer Mask')..
Layer Masks and gradients |

The result is an image that's green on top (white pixels in a mask don't affect the layer), white at the bottom (black makes the green pixels invisible, so you can see the white background) and everything in between is a transparent green with the white background shining through.
Layer Styles in combination with Layer Masks |
In this example the layer style wasn't affecting only the layer, but the result of the layer and its mask (a green circle):

Vector Mask |
We've seen earlier that our regular masks are always grayscale.
Photoshop however also allows us to use vectors to
mask a layer. These vectors are not drawn on the normal
grayscale masks but on a dedicated Vector
Mask.
A Vector Mask can be created by going to the menu and selecting: Layer / Add Vector Masks / Reveal(hide) All
Now look at this example:

If we add a shape, in this case with the Ellipse Tool with the Shape Layers icon selected in the options bar, we're actually creating a Fill Layer in combination with a Vector Mask.
There are many way to create Vector Masks and these are just two examples.