Combine a Layer Mask with a Vector Mask |

There is something about the above example that is important to know and that is that vector masks have a higher priority than layer masks. Look at this image:

With the regular layer mask active and the vector mask disabled you'll notice that the black line in the layer mask affects the complete layer. With the vector mask enabled and the layer mask disabled you'll see a green circle.
With both masks active you'll see in the previous image that the layer mask is restricted to the vector mask; the black line only affects the green circle.
You'll also notice that we now have a link symbol ![]() between
the fill layer and the layer mask (you can move the mask
independently of the layer by turning this off) and a
link symbol
between
the fill layer and the layer mask (you can move the mask
independently of the layer by turning this off) and a
link symbol ![]() between
the layer mask and vector mask (you can move the vector
mask independently of the layer by
turning this off).
between
the layer mask and vector mask (you can move the vector
mask independently of the layer by
turning this off).
It's important to know that the masks are linked to the layer and not each other, meaning that both masks can be moved independently of each other, even if all link symbols are visible.
Combine Layer Masks |
This makes it for example possible to combine layer masks as shown in the next screenshot.
This layer set mask will also effect all layers that are inside nested layers.

Use clipping layers with Layer Masks |

Masks and filters |

Masks and adjustment layers |
Look at this example:
 .
.
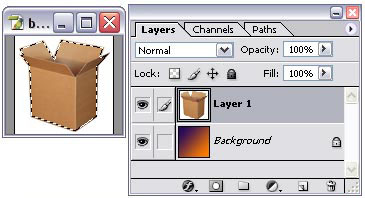
We have a background filled with a gradient and on top of that we have a box that has a layer mask attached to it. The layer mask has made the white background of the box layer invisible and that's why we're now looking at the background gradient of the background layer.
In the next example we've activated ![]() the
Hue & Saturation adjustment layer that is clipped
to the box layer(Ctrl+G ( Command + G on the Mac) or Ctrl + Alt + G ( Command + Option + G on the Mac) if you're using Photoshop CS2), so that it
will
only affect that particular layer:
the
Hue & Saturation adjustment layer that is clipped
to the box layer(Ctrl+G ( Command + G on the Mac) or Ctrl + Alt + G ( Command + Option + G on the Mac) if you're using Photoshop CS2), so that it
will
only affect that particular layer:

Notice how we used the Hue & Saturation adjustment layer to change the color of the box to blue. Its mask was disabled.
In the next example we've activated the mask that contains a linear gradient going from white (top) to black (bottom). Remember what I said earlier; lighter grays decrease the transparency, darker grays increase the transparency. The mask has used this to affect the result of the original Hue & Saturation adjustment layer.

Masks and selections |
When we now click on the New Mask icon

Important to know is that you can also invert a mask. In the next image I've selected the mask (notice the double border) and pressed Ctrl + i (Command + i on the Mac):

You can also invert an image using the menu: Image / Adjustments / Invert.
If we don't change the mask after we've created it, then
we can use this mask to return to our original selection.
This is done by a Ctrl + left
mouse click on the layer
mask (Ctrl is command key on the Mac). The layer doesn't
need to be active for this.
Being able to convert a mask to a selection is a great
advantage, because it allows us to save a selection without
the need to save it in a channel. It's also an advantage
to see what is selected and masks allow us to do this.
If you have created a mask based on a selection and want to save this mask because you're planning to make adjustments to it, then either save it as a channel or duplicate the layer and make it invisible.
Shortcuts |
| PC | Mac | |
| Select Composite | Ctrl + ~ | Command + ~ |
| Select Layer Mask | Ctrl + \ | Command + \ |
| Load Composite as selection | Ctrl + Alt + ~ | Command + Option + ~ |
| Load Mask as selection | Ctrl + Alt + \ | Command + Option + \ |
| Layer Mask as Rubylith | \ | |
For more help with Photoshop check out our![]() section.
section.