Transparent 3D Objects - viewed times
Introduction |
In this Photoshop tutorial we show you how to create transparent 3D objects. The final image is not as important as how you actually achieve this transparent 3D look. Use the Photoshop technique for any kind of project you have in mind. Try to experiment with some of Photoshop's default vector shapes. |
1. Prepare the background and draw the shape |
Press the letter D on your keyboard to set the foreground color to black and background color to white
Grab the Paint Bucket Tool
Select the Custom Shape Tool by
clicking on its icon ![]() (B)
in the tool bar:
(B)
in the tool bar:

Go to the options bar and click on the area marked with A to show all shapes. Then continue by clicking on the little black triangle in the upper right corner (B) to open the fly-out menu:

In the menu select Ornaments:

The following window will pop up:

It's up to you what you want to answer here; click OK to replace the current shapes or click Append to append them to the current ones.
Now select the Spiral shape by double clicking on it in the preview window...

...and make sure the option Shape Layers in the options bar is selected:
![]()
2. Add the shape and add the transparent 3D effect |
![]()
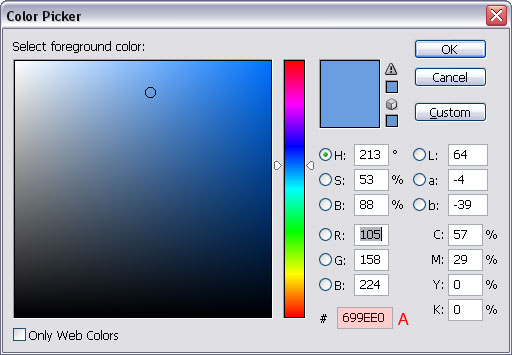
In the Color Picker window
that opens you enter the value 699EE0 in
the area marked with A.
Click on the Custom Shape Tool icon ![]() again
if it's not active or press U on
your keyboard.
again
if it's not active or press U on
your keyboard.
We're now going to draw the shape. Hold down the shift key
while you do that to constrain its proportions and draw something like
this:

Don't make the shape too big, we need the extra empty
space around it in one of our future steps.
Don't you worry if you can't get the shape centered the first time;
just draw the right size while holding the shift key like I told you
earlier and then use the Path Selection Tool ![]() to
move it into the right position.
to
move it into the right position.
Make sure that the shape layer is active (a ![]() in
front of it)...
in
front of it)...

...and press Ctrl+E (Command + E on the Mac) to merge the shape layer with the background layer:

Now go to the menu and select Filter / Blur / Motion Blur... and select -30 for Angle and a Distance of 30 pixels and click on OK:

Duplicate this background layer by clicking on its icon
in the layers palette and while holding the mouse button,
drag and drop it on the Create
a New Layer icon ![]() :
:

Again, go back to the menu but this time select Filter / Stylize / Glowing Edges... and enter
- 1 for Edge Width
- 20 for Edge Brightness
- 1 for Smoothness

..and click OK.
The last thing we have to do now is changing the blending mode of the Background copy layer to Lighten:

This is the final result:

Final words |
I showed you a technique that explains how make 3D objects and it's now up to you take it a step further.
Here are two other examples, this time using text:


I hope you enjoyed this Photoshop tutorial.
For more help with Photoshop check out our![]() section.
section.