Pyramid
3. Add sides |
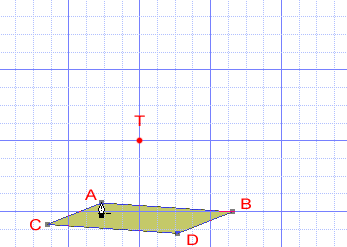
Only two sides of the pyramid will be visible at any time, so we're only going to add the two sides marked with points
C,D,T and D,B,T:

The problem with Photoshop is that it only allows us to snap the pen tool to guides and grids, not to single points that don't lay on guides or gridlines, so we have to approach this in a different way to get all sides well aligned.
First duplicate the shape we have now by dragging and dropping the layer twice on the Create a New layer icon ![]() in the layers palette:
in the layers palette:

You'll also notice that I've changed the color of the new shapes. You can do that by clicking on the Fill Layer thumbnail in the layers palette. My advice is that you do the same. You don't need to use the exact same colors, but if they look a bit the same, then you might avoid some confusion during the next few steps.
Make sure that the top layer is active (you'll notice a ![]() in front of it).
in front of it).
![]() In Photoshop CS2 this has changed; an active layer won't have the
In Photoshop CS2 this has changed; an active layer won't have the ![]() in front of it but will have a darker gray background in the layers palette.
in front of it but will have a darker gray background in the layers palette.
Select the Path Selection Tool ![]() in the Tool Bar:
in the Tool Bar: ![]()
Click with the mouse on the shape in your document window to activate it. All four points that are part of this shape will now be visible.
We're now going to delete one of the corner points. Grab the Pen Tool and ![]() and move it over point A:
and move it over point A:
You'll notice that the pen tool will have a - sign beside it, which means that a single click will remove this point. So click on it to remove it.
We're now going to make point C the top (T) of our pyramid.
Go to the Tools Bar, but this time select the Direct Selection Tool![]() . If you don't know where to find it; it's under the Path Selection Tool
. If you don't know where to find it; it's under the Path Selection Tool ![]() ; click on this tool in the Tool Bar and hold down the mouse button and after a short second a little window will pop up in which you can select the Direct Selection Tool:
; click on this tool in the Tool Bar and hold down the mouse button and after a short second a little window will pop up in which you can select the Direct Selection Tool:
![]()
Now click on point C, hold down the mouse button and drag the point to location T (our top) and release the mouse button; point C will snap exactly in place at the new location:

We're now going to make this layer invisible by clicking on the ![]() icon in front of it and then we click on the layer underneath to activate that one (it will now have a
icon in front of it and then we click on the layer underneath to activate that one (it will now have a ![]() in front of it or have a darker background in the layers palette if you're using Photoshop CS2).
in front of it or have a darker background in the layers palette if you're using Photoshop CS2).
We're going to use for this layer the same steps as we used for the previous layer, but with one difference; at the end we don't move point C, but point B instead (the one in the upper right corner) to the top (T) of our pyramid until it snaps into place. Click here to return to the previous steps in which we're now going to add this 2nd second side and continue with the next steps after you're done.
...continued
Once we have our two sides the way we want them, make the top layer visible again by clicking on the empty area in front of it where we normally would see the ![]() icon; the icon will re-appear. Now press Ctrl+H (command + H on the Mac) to make the grid and guides invisible:
icon; the icon will re-appear. Now press Ctrl+H (command + H on the Mac) to make the grid and guides invisible:

To sum it all up:
- Set up a grid and snapping
- Draw a square shape which serves as the base of your pyramid
- Rotate this shape so that we will see two sides in our final pyramid
- Resize it to create perspective by pulling down the middle top control point
- Duplicate the base shape twice
- Delete and move some points to the top to create the two sides
Press Ctrl+H again (command + H on the Mac) to make the grid and guides invisible again and then go to the menu to select View / Show / Grid which will turn off the grid.
Note: Ctrl+H is not the same as turning a grid off. Ctrl+H only hides things like grids, selections, slices, etc, but they're still active. So if you ever wonder in the future why you're for example unable to modify some area in your document window, then it might be that you still have a selection active that is not visible... Remember that, because you will be pulling your hairs out like thousands have done before you.
We're now going to add some texture to the side of the pyramid. First make sure the top layer is active. Go to the layers palette, click on the Create a new fill or adjustment layer icon ![]() and select in the menu Pattern...
and select in the menu Pattern...
Look at the next screenshot. Click in the area marked with A to show all your active gradients. Click on B to open a fly-out menu in which you select Rock Patterns (C).
A window will pop up asking you if you want to replace the current patterns with the ones you've selected. Select OK to replace or click on append to add the patterns to your current patterns. What to choose is up to you, but don't you worry if you decide to replace the current patterns, you can always getting them back by using the same steps, they won't be lost.
Now select the pattern marked with D in the patterns preview window and click OK.

The pattern will fill the whole document and we need to "clip" it to the layer underneath, so that the texture will only affect the pixels of that particular layer. You can clip a layer by pressing Ctr+G (command + G on the mac)
![]() In Photoshop CS2 use Ctrl + Alt + G (Command + Option + G on the Mac) instead.
In Photoshop CS2 use Ctrl + Alt + G (Command + Option + G on the Mac) instead.
Now set the blending mode of this Pattern layer to Soft Light:

Note: it's possible that the result doesn't look good and that you can hardly see the pattern. In that case double click on the thumbnail of the Shape Layer (not the Pattern layer) in the layers palette and change its color until you see what you like.
Continue by adding the same pattern to the layer underneath, but this time set the blending mode of this second pattern layer to Overlay and the Opacity to about 80% (these settings create a slight 3D texture effect). Again, you might need to change the color of this shape layer too to get the best results.
Now make the yellow base shape at the bottom invisible by clicking on the ![]() icon in front of it, because we don't need it anymore and its edges will be slightly visible if we leave it visible.
icon in front of it, because we don't need it anymore and its edges will be slightly visible if we leave it visible.


Now you can continue to spice it all up with a soft shadow, maybe a sky, adjusting colors, adding some rough edges to the pyramid, adding sand, clouds, etc. It all depends on what you have in mind at that time or what you want to use the basic pyramid for. Just a quick example that shows you how to take the result to a higher level with some of the above and extra brush work:
I hope that you enjoyed this tutorial.
For more help with Photoshop check out our |
