Postage Stamp - viewed times
1. Preparing the document |
| Open a new document in Photoshop with a size of 350 x 300 pixels.
Add a new layer by clicking on the Create a New Layer icon |
2. Preparing the brush |
Select the Brushes Palette by using one of the following 3 methods
- Pressing F5 on your keyboard
- Selecting the Brushes Palette
in the Options Bar

- In the menu: Window / Brushes
In the Brushes Palette select Brush Tip Shape (A) and select a Diameter for the brush of 17 px (B), a Hardness of 100% and a Spacing of 140 (C). Make sure that all the options underneath Brush Tip Shape (like Shape Dynamics, Scattering, Texture, etc) are not selected.

Press the letter D on your
keyboard, which makes the foreground color black and the
background color white:![]()
Now press X on your keyboard
to switch fore- and background color: ![]()
The foreground color should be black now.
3. Draw the dots |
![]()
Now draw the initial shape of the stamp with the rectangle tool, until you have something like this:

Before you proceed with the next step; make sure that
the Layer Mask is still active (notice the ![]() in
front of the layer and the double border around the mask),
if not, click on it.
in
front of the layer and the double border around the mask),
if not, click on it.
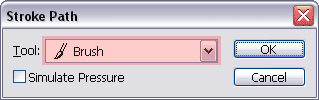
The next step is to activate the Paths palette by clicking on the Paths tab (A), opening the fly-out menu by clicking on the little black triangle (B) and selecting Stroke Path... (C).

In the window that pops up, select Brush and click OK.
A quicker way to do the same is by clicking on the Stroke Path with Brush icon![]() in the Paths palette:
in the Paths palette:

Tip: hold down the Alt key
(option key on the Mac) before you click on the Stroke Path with Brush icon![]() to
be able to select the tool you want to use for the
stroke like we saw in an earlier screenshot. By
default Brush is selected.
Use the method that your prefer. For beginners it
might
be easier to remember the fly-out menu than
all these dozens of icons and that's why I'm showing
both approaches.
to
be able to select the tool you want to use for the
stroke like we saw in an earlier screenshot. By
default Brush is selected.
Use the method that your prefer. For beginners it
might
be easier to remember the fly-out menu than
all these dozens of icons and that's why I'm showing
both approaches.
Ok, so we have stroked the path, but you might wonder why you're not seeing anything change in the paths palette. That is because the path palette only shows vector based shapes and not pixels. Our stroked path is based on a brush, so the stroke was added to the pixel based mask (which was active during the stroke). You'll see soon enough.
4. Final touches |

This will convert the path to a selection.
Now click on the Layers tab to
activate the layers palette and disable the mask by clicking
on the layer's thumbnail with the checkerboard pattern
(you'll notice a![]() appear
in front of it and a double border around the thumbnail).
appear
in front of it and a double border around the thumbnail).
Notice that our mask now shows the result of stroking
the path:

Set the foreground color...
![]() ...
by clicking on the foreground color in the options bar.
...
by clicking on the foreground color in the options bar.
In the Color Picker window that pops up, select your
preferred color and click OK.
Select the Paint Bucket Tool ![]() in
the Tool Bar and fill the selection:
in
the Tool Bar and fill the selection:

You can finish it off by adding some noise to the paper, roughening the edges, adding some color stains and an image, it all depends on how you want it to look.

Have fun!
For more help with Photoshop check out our![]() section.
section.