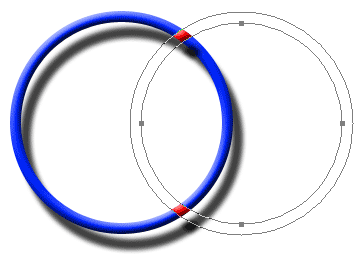
Intersecting Rings - viewed times
Introduction |
In this Photoshop tutorial we're going to create intersecting rings. Instead of using selections, we're going to use shapes. Shapes are vector based and more useful than selections for this particular goal, since we will be able to resize our rings without losing quality. This is not just a Photoshop tutorial about rings, it's also my intention to show you more about fill layers, vector masks and regular masks and how they can be used in a useful way. |
1. Create a circular shape |
Go to the tool bar and select the Ellipse
Tool ![]()

Before we go any further, have a look at your options bar first after you've selected this tool.
It's important that we have the Shape
layers icon ![]() selected
in the tool bar (A). Notice
that the Ellipse Tool icon
selected
in the tool bar (A). Notice
that the Ellipse Tool icon ![]() is
active (B).
is
active (B).
It's also
import is that
the Create a new shape layer icon
is selected![]() (C).
(C).
By double clicking on the area marked with D,
we can change the color of the shape. The color doesn't
matter
so much for this tutorial, but let us select a regular blue this time.
![]()
![]()
We're now going to draw a circular shape and by holding down the shift key before we start drawing, we're constraining the proportions of this circle so that it will look like a perfectly round one. Start somewhere in the top left corner and create a circle that fills about a one third of your document window.
Now what has happened? Let me explain a few things.
First of all you'll notice that the circle has some
weird edges. That's actually the path that created this
shape.
There are ways to make it invisible, but it can be confusing
for some people who do this tutorial, so I'll just leave
it the way it is.

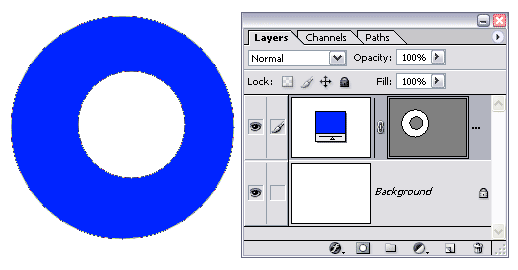
Look at our Layers Palette.
A is what we call a Fill Layer. All it does is filling a layer with a color. The difference between filling a layer with a Fill Layer and the Paint Bucket Tool, is that with a Fill Layer we can simply change the color by double clicking on the icon in the layers palette.
B is a vector mask that is based on... yes, vectors, in this case a vector path that draws a circle. The double borders around the mask also reminds you that this mask is active. Keep that in mind in case you're experiencing weird problems; check whether your mask is active.
I'm not going into too much details about masks and how they work, because I've already discussed that in the Layer Masks Photoshop tutorial in great detail. All I can say right now is that a mask restricts which parts of a layer are visible and in this case it restricts the fill layer so that in the end all we see is a circular shape.
Things become more clear when you select the Path
Selection Tool ![]() in
your tool bar (shortcut is A).
in
your tool bar (shortcut is A).
Select the path with this tool to move it around. You'll
notice that it's just moving the path around (check layers
palette), not the shape, although it looks like we're
actually dealing with a shape. So shapes in Photoshop
are a bit odd; they're just the result of vector paths
inside a mask of a Fill Layer. That's a mouth full, I
know, but try to understand it.
2. Create a second path and adjust dimensions |
Draw a smaller circle on top of the one we already have and again hold down the shift key when you draw the shape:

The second path has subtracted a shape (because we selected ![]() )
from the first shape we had.
)
from the first shape we had.
I'm now going to show you how to align both paths and to change dimensions.
Let's start with aligning both paths. Select the Path
Selection Tool ![]() in
your tool bar and select both paths by pulling a square
around them by holding down the mouse button:
in
your tool bar and select both paths by pulling a square
around them by holding down the mouse button:

Go to the options bar and click on the following icons:
| = Align vertical centers | |
| = Align horizontal centers |
The centers of both shapes are aligned now.
The next step is to change the diameter of the ring. With the Path Selection Tool still active we select the Show Bounding Box option in the options bar:
![]()
This will create a bounding box around our shape:

While holding down the shift key click on one of the corner points and move them in- or outwards and release the shift key and mouse button when you're done and press the enter key.
Click with the Path Selection
Tool somewhere outside our shapes to deselect
all paths.
This time click on the inner path in the document window
to select it and as a result the bounding box will
appear again.
Click on one of the corner points and hold down the mouse
key. Make sure that you don't move your mouse! Hold down
the Alt key(Option key on the Mac) and the shift key and move that particular corner in- or outwards.
Release the mouse button and all keys when you're done
and press
the enter key.

We needed to hold down the Alt key to make sure that the center of this path would stay in the same location.
Note: If we had selected Alt + Shift key before clicking on a corner point, then we had created a new path and that's not what we want, so make sure that you select the corner point first and hold down the mouse key, before your press the Alt and Shift key simultaneously!
3. Add layer styles and create a second ring |
Return to the options bar and deselect the Show Bounding Box option because we don't need it anymore and it's only distracting (visually).
Let's add some styles to this ring. Click on the Add
a Layer Style button![]() in
the layers palette and add the following styles:
in
the layers palette and add the following styles:
Drop Shadow:

Bevel and Emboss:

Duplicate
this layer by clicking on the fill layer icon in the
layers palette and while holding the mouse button,
drag and drop it on the Create
a New Layer icon ![]() .
.

Double click on the Fill Layer icon in this new layer to change its color to a regular red:

The top layer should be active (check).
Make sure that the Path
Selection Tool ![]() is
selected and then select the complete ring by drawing a
rectangular selection around it with this tool (both paths
will then be
selected, since the ring is made of two paths).
Next, click on this red ring and while holding
down the mouse button move the ring to the right, until
you
have something like this:
is
selected and then select the complete ring by drawing a
rectangular selection around it with this tool (both paths
will then be
selected, since the ring is made of two paths).
Next, click on this red ring and while holding
down the mouse button move the ring to the right, until
you
have something like this:

4. Fix intersecting areas |
Now we're going to do some magic. Make sure that the top layer is selected (the one with the red ring) and Ctrl + click (Command + click on the Mac) on the blue Fill Layer icon of the layer underneath in the layers palette.
While still on the layer with the red ring, you now
have a selection that is based on the layer with the
blue ring. We are now going to add a mask by clicking
on the Add Layer Mask icon ![]() in
the layers palette:
in
the layers palette:

The result will look a bit odd, but we're going to fix
that by inverting the mask; press Ctrl
+ i (Command
+ i on the Mac):

We now have to fix the bottom area where both rings
intersect. The red ring has to go over the
blue ring in that particular area. The mask should still
be active (important) if you haven't clicked anything
else .
First press D to change
the foreground color to white: ![]()
Now
select the Tool Brush ![]() in
the tool bar and select a regular brush with a size
that's slightly bigger than the opening that you have
to fill
and then paint on the open area in your document window
and as magic the red ring will reappear:
in
the tool bar and select a regular brush with a size
that's slightly bigger than the opening that you have
to fill
and then paint on the open area in your document window
and as magic the red ring will reappear:

We still have to deal with one more problem. Look at this area of our image:


At A there we can see a bevel that we don't want. It's not that clear what I mean when you look at that screenshot, so I've magnified it in the second image in which you'll notice that the darker edge of the red ring disappears the closer we get to D, where it's almost gone.
You'll also notice that there is something wrong with the shadows when you look at B and C.
There is a very simple way to solve all this. With the top layer still active, double click on the word Effects in the layers palette to open the layer styles:

Now double click on the area that reads Blending Options:

Now select the option Layer Mask Hides Effects and click OK:

Note: I'm using Photoshop CS and I'm aware that there are earlier Photoshop versions that don't have this option. There are other ways to do this and probably one of these days I will write about it.
So what is the result of this Layer Mask Hides Effects option?

Like always; have fun!