Water Drops - viewed times
1. Preparations |
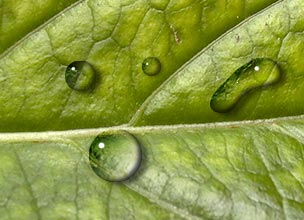
| Open an image in Photoshop that needs one or more water drops. In my example I used the image of a leaf that you can download here (In Windows: right click, save target as).
|
 Add a new layer by clicking on the
2. Add a gradient |


If everything is ok, then we should see a preview of
the gradient in the options bar (A).
Make sure that it goes from black (left) to white (right).
If that's not the case then make sure that the option reverse is
not selected (C). If
you don't see a black & white
gradient, then
double click on the gradient in the options bar (A)
and select the gradient from the list and click OK.
We are now going to draw
a gradient from left to right. We start at the red dot
and pull the gradient all the way to the blue dot.
After you're done, deselect the selection by pressing Ctrl + D (command + D on
the Mac) on your keyboard or by selecting in the menu Select
/ Deselect.
3. Add transparency |
 Set
the blending mode of the layer in the layers palette
to Overlay.
Set
the blending mode of the layer in the layers palette
to Overlay.
4. Add layer styles effects |
First select Drop Shadow and use the following settings:

Now select Inner Shadow and use the following settings;

The result of this later style should look like this: 
Remember; you're always free to make slight changes to the settings in my example. It all depends on what your background looks like or how big your water drop is.
5. Add a highlight |
 Press
de letter X on your keyboard
to switch the fore- and background; the foreground color
is now white. Now select a hard brush
Press
de letter X on your keyboard
to switch the fore- and background; the foreground color
is now white. Now select a hard brush That's it. A quick and simple way to create a convincing looking water drop.
Final words |
You can add extra copies of this Layer Set by dragging and dropping the Layer Set on the New Layer icon
Remember,
it's also easy to resize the content of a Layer Set
by selecting the Move Tool ![]() and
selecting in the menu Edit/Free
Transform or
by pressing Ctrl + T (command + T
on the Mac).
and
selecting in the menu Edit/Free
Transform or
by pressing Ctrl + T (command + T
on the Mac).
Pulling a corner with the mouse will
allow you to
resize
the
content of the layer set. Make sure to hold down the shift key while you do
that to constrain the proportions of the water drop.
When you resize a water drop, make sure you change
the distance of the drop shadow; make it smaller if
the water drop is going to be smaller, make it bigger
if you want a larger water drop.
You can change the shape of the water drop by selecting
the layer with the water drop and using the Liquify Tool ( In the
menu choose Filter/Liquify... ) and
using the Forward Warp Tool ![]() .
.
 The
technique that we have discussed in this tutorial doesn't
change the background behind the water drop. Normally
a water drop works like a magnifying glass and will
magnify the background underneath.
The
technique that we have discussed in this tutorial doesn't
change the background behind the water drop. Normally
a water drop works like a magnifying glass and will
magnify the background underneath.
If you want to distort
the background then you have to Ctrl + click ( Command
+ click on the Mac) on the thumbnail of the layer with the water drop
and it will create a
selection
based on the water drop.
You then have to make the background active (it has
to be unlocked, if it isn't double click on it to
unlock it) and with the selection active you go to
the menu
and select Filter/Liquify... and
use the Bloat Tool ![]() to
magnify the background by one or two clicks with the
mouse button on the selected area of the background.
to
magnify the background by one or two clicks with the
mouse button on the selected area of the background.
Be aware though; this means that you can't move the
water drop anymore, since moving the water drop does not move this magnified
area of the background.
Have fun!
For more help with Photoshop check out our![]() section.
section.